One of the key features of a record cleaning machine is the ability to spin the record without manual intervention. I'm getting really sick of cleaning records by manually spinning them on my turntable while I scrub.
 Some folks on AudioKarma.org had suggested use of a bread machine, presumably because it uses a fairly high torque motor and some kind of gear reduction.
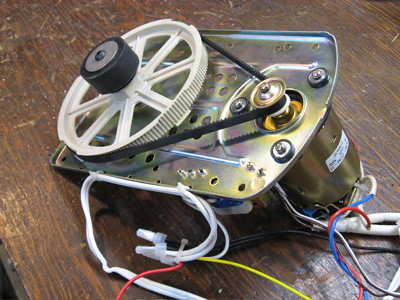
Upon dissecting the $2 bread maker I got from Goodwill, I found a metal plate onto which a motor and drive mechanism are mounted. As shown in the pic to the right, the motor drives the stirring mechanism on the opposite side of the plate via a tooth belt.
The white cog wheel is attached to a stainless steel drive shaft riding in a bronze bearing by way of a 6mm nut. The drive mechanism is attached to the drive shaft and engages the stirring gizmo in the bread bucket to stir and knead the bread, similar to how the blades of a blender are coupled to the blender motor.
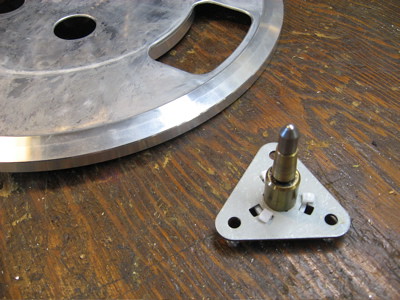 But how to drive a turntable platter? The two I had on hand spin on greased bearings attached to a mounting plate to affix them to a horizontal surface (see pic to the left).
They are both from belt drive turntables. Should I try to use a turntable belt? These are usually low tension belts and will slip with the slightest drag on the platter. I needed a higher torque, higher traction solution.
I want to keep this simple, cheap, and practical with minimum fabrication involved; I don't have a machine shop and I don't want to spend a fortune on this project. Those constraints eliminate a lot of design options. Direct drive would've required fabrication of some type and possibly re-engineering the drivetrain making this an unnecessarily hard problem to solve.
Why not drive the platter rim with a rubber idler wheel attached directly to the 6mm threaded end of the drive shaft? A trip to the hardware store and $18 later I had a pile of options. What ended up working best was a rubber hole plug mounted to a shaft extension. You can see the black idler wheel in the top pic.
To extend the shaft, I used a 5/16" x 1.5" aluminum spacer, basically a hollow aluminum tube, which I threaded with my new 6mm x 1.0mm tap. (Aluminum being a softer metal is easier to tap especially with an incorrectly sized hole).
 I disassembled a 1-3/4" hole plug (a rubber puck sandwiched between two plates, compressed by a nut and bolt to squish out and fill a hole). The hole plug rubber piece slid over the aluminum spacer shaft, and with washers on top and bottom and a 6mm cap end bolt on top to cinch it down, et voila, rubber idler wheel.
As a bonus, the gear reduction afforded by this small wheel driving the large platter means the record will spin at a goldilocks speed: not too fast, not too slow, but just right.
Next step is mounting the drivetrain and platter on a chassis. I want the idler wheel to apply user-adjustable pressure to the platter. It adds complexity to the design but it makes up for imprecise mounting, lack of trueness of the drive shaft and more importantly, accomodates wear of the rubber wheel.
Eventually, the motor is to be computer controlled. Before that is possible, I'll need to break out my copy of DC Power Supplies: A Technician's Guide
Squeaky: < prev | next >
No comments:
Post a Comment
Note: Only a member of this blog may post a comment.